
How to start a podcast? (in 2022)
Podcasting in 2022 is thriving more than ever. New podcasts are been published every day and people are searching about their favorite topics.
But you may be wondering, how can you start a podcast yourself?
You can start a podcast about any topic or niche.
Maybe you’re into board games with your friends, and you want to connect with more people. You may want to review movies that you recently watched or you may want to start a show about cooking.
I bet there’s people that would like to hear what you have to say and connect with you.
Starting a show doesn’t have to be intimidating. It’s simpler than you may think.
In this guide we will walk you through every step there is and by the end you will be able to share your first episode with your friends!
Planning
Choose a topic
What’s your hobby? What do you enjoy doing in your free time?
There’s something you enjoy spending time on. This may be a great topic for your podcast.
Choosing a niche and narrowing down your topic will help your podcast get discovered easily by people that are also interesting in it.
For example instead of making a podcast about “Movies Reviews” you may want to narrow it down on “80s Movies Reviews” or “French Movie Reviews”.
There’s quite a chance some people are interested in something specific and they will search for it.
If you instead want to make a podcast with a generic theme, it’s okay too.
Just make sure that you name your episodes in a way that people will find what they’re looking for easily. A good idea is also to group them.
Give your podcast a title
Now that you have chose a topic about your podcast it’s time to find a name.
You can get inspired by podcasts that you already listen or you find on your favorite podcast app (like Apple Podcasts) and use your imagination.
Even though you can change the title later, it’s a good idea to take some time to come up with a good one and make sure there’s not another podcast using it.
It can be as specific or as abstract as you like, but keep in mind that this is the first thing people see when they go through lists of podcasts.
Try to make it stick out.
Find Co-Hosts (Optional)
You can produce a show all by yourself and that’s great, but if you’re starting out it may be easier to have co-hosts.
Try asking your friends or business partners if they’d like to join. There’s probably people around you that have similar interests as you and they’d like to help.
Having multiple people on a show will change its format and there will be more discussions and different opinions.
Also if you consider interviewing people will be easier as both co-hosts will come up with questions and chime in.
A big upside is that tasks will be split too.
For example one co-host can take over the editing of the show and the other one the promoting and sharing it to social media.
Beware though that each co-host must be committed to the project and won’t drop out in the future. Also schedule the recording of the show and make sure that everybody knows when new episodes must be recorded (weekly, monthly…)
In the case of a co-host dropping off, it’s not the end of the world. You can continue the show or find another one.
Episode Length
There’s not a “best length” for every type of podcast out there.
You get to decide what’s best based on your topic or about what you have to say.
If you can come up with something like “30 minute per episode” podcast that’s great.
Nobody will force you any limits.
You can go as long as you’d like or set specific limits.
But be careful, mixing 20 minute episodes with a hour and a half ones may not get the best reaction from your audience.
If you went off your goal time limit you can always fix it in the editing by cutting some parts or by adding a few more.
You can even ramble with friends for hours and use only the good parts.
Episode Format
In podcasts it is common to have intro music.
There’s quite a few resources to download creative commons music from and use it freely in your show.
Some shows even have a small teaser in the beginning, before the intro music, to get the audience excited about what the episode will be about.
Keep in mind that not every listener has listened to all your episodes from the beginning. There may be new listeners so it’s a good idea to have an intro to each episode giving a small description of the show.
Near the end of the show it’s a good idea to ask listeners to leave a review on iTunes, on your site, or to contact you with comments and suggestions.
In the feature you may find sponsors and have ads between segments too.
Finally there must be an outro segment which you can narrate over music (you can re-use the intro music to close your show)
Preparation
Choose Intro Music
Many podcasts feature intro music in the beginning of the episodes.
Intro music will help build your podcast’s branding.
After a few episodes, your audience will have memorized and expect to listen to the intro music you have chosen on every new episode.
Make sure the music that you choose fits the theme of your podcast and it’s a good introduction to what you’re generally going to talk about.
If you have a “good news” type of podcast, choose an upbeat theme. If you have a “horror” podcast it’s a good idea to choose darker sounding music.
There are a few resources to find your intro music. Some of them have creative commons (free) content, and some of them have music that can be licensed.
Sites With Free Music
It may take quite a while till you find the perfect fit for your podcast, but make sure you don’t rush that part.
It’s better to take your time than to have to decide you want to change it after a few episodes.
There’s also services that you will find paid theme songs.
Sites With Paid Music
Create Cover Artwork
The cover artwork of your show is what people will see when they’re searching for podcasts or scrolling through lists, so you have to make it stick out.
It’s a good idea for your artwork to contain the title of your podcast in a big font size, as many podcast directory apps are displaying covers in small sizes.
The artwork of your show must be at least 1400x1400px and les than 3000x3000px or 512kb in size.
Other than that, there are no additional guidelines, so you have to use your imagination or go through podcasts to get inspired.
There are many resources online that you can google to find and even some online artwork generators, that you can use to quickly come up with something, without needing to download any additional software.
If you’ve got a budget you can search for a graphic designer that can help you and also make suggestions about what you could use.
Don’t overthink it right from the beginning.
You can change your artwork later and replace it with a better version.
If you do so, give it a few days until podcast directories fetch the new version and replace the old one.
Get a microphone
You may have realized that audio quality is a big factor for how the audience perceives a show. In order to build a great podcast, you need a good microphone.
I bet you have discovered podcasts about a topic you’d like to hear and later turned them off because the audio quality was just bad.
This issue gets magnified when you’re on the go and there’s background noise.
If you’re walking home and there is traffic, bad audio quality will make it very difficult to listen to what the hosts are talking about.
You may be thinking about using your headphone’s microphone or the one that comes with your laptop but that’s generally a really bad idea.
Also, make sure that your room is silent and there’s no background noise when you’re recording.
Turn off everything that makes noise, close the windows of your room and try to record at quiet hours.
You may think that background noise won’t show up on the recording, but trust me, it will and it will annoy your audience.
A professional recording studio would use XLR microphones, preamps, audio interfaces, but it’s not necessary. There’s budget friendly equipment that you can connect via USB on your desktop computer or laptop and the quality will turn quite well.
Some microphones even have both a USB output, as well as an XLR one, so you can later get an audio interface with better preamps than your microphone’s built in one.
Microphone Recommendations:
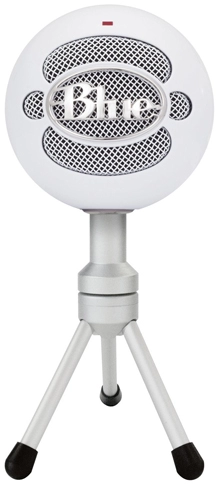
- The Blue Snowball USB Microphone is a great budget microphone choice. It can connect directly to your computer and it is plug and play. The killer feature is that it has multiple pickup patterns! That means that if you’re recording alone you can set it in the cardioid pattern and eliminate noises that come from behind the microphone. If you’re recording with friends you can turn it into the omnidirectional pattern and it will pick up sound 360 degrees around the microphone. This way you won’t need a second one for more than one host and the audio quality will be great!
- The Blue Yeti USB Microphone is one step up from the previous one mentioned. It has a little bit better audio, a sturdier base, more pickup patterns (Cardioid / Omni / Figure 8), gain control, mute and more. It’s a very good choice for many applications (including music instruments) and there’s a lot of people using it. It won’t be a huge step up on audio quality but if you’re making a one time investment in a microphone you may want to consider buying it.
- The Audio-Technica AT2020USB+ is another choice by Audio-Technica, a company that produces budget, as well as very high end microphones used in professional recording studios. This one will give you great audio quality, it has a mix control, a headphone volume output control, only a cardioid pattern and a USB connection.
- Lastly, the Audio-Technica AT2005USB is a more budget friendly choice by the same company, a dynamic microphone (not a condenser one as the previous one). It records in the cardioid pattern, has an on / off switch and features both a USB and an XLR output, which will make it easier to use it with an external audio interface later. As it is a dynamic microphone, it will do a better job eliminating room noise but it may not sound as clear and “airy” as the previous one. Nonetheless it will give you high quality sound too.
There’s a lot of choices and the list could go on and one, but there won’t be a huge difference between all of these microphones.
You can pick one of this list and it will be a great investment that your audience will appreciate.
Just make sure that your room is quiet, it isn’t echoing and you keep a good distance from the microphone.
Also consider getting a pop filter too, that will fit your selected microphone. It will help reducing the plosive sounds and make your audio clearer.
Audio Software
Great, now you have planned your podcast and got the necessary equipment.
It’s time to start recording it. There’s a lot of software out there, both free and commercial, that will help you.
Truth is, you don’t need anything fancy to get a high quality podcast.
It’s more about knowing how to use the software you chose, whatever you choose.
There are a lot of commercial software, promising “better audio” but I’d recommend generally ignoring them.
You don’t need fancy software or expensive audio plugins.
To get a high quality podcast you need some simple recording software and some basic plugins like an equalizer, a compressor and a limiter.
Also it is a good idea to find software that supports multi channel recording and editing, as you may wish to have each co-host or intro music and sound effects on separate channels, giving you more control about volumes and mixing.
Audacity
Audacity is a powerful free, open source, cross platform audio software.
It’s easy to use, it supports multi track audio recording and editing, and you can use it both on your Apple computer or Windows.
It may be the first and last piece of software that you will need to record and edit your podcast, just take your time to learn it and get familiar with it.
Don’t be fooled by it’s simplicity, it was initially released on 2000 and it is been actively developed since then.
There’s a variety of plugins built in, focused for both amateur and more professional usage.
Get familiar with a few of them like Equalization and Compression.
GarageBand
Garageband is a Mac only, free digital audio workstation that comes with macOS and iOS devices.
It allows users to create both music or podcasts with it, featuring multiple tracks and audio filters, using the AU (audio unit) standard.
A nice feature, that other software don’t have is that it contains a library of audio effect and loops that you can freely use on your episodes.
Also you can use templates and it has a ready “Voice” template that it can be used for podcasts.
Automation is another feature that will allow you to control mid track volumes of your music tracks. You can also use it to automate volumes of your voice tracks to make them more even.
It has nicely designed plugins like equalizers, compressors, reverbs, distortions a DeEsser and many more.
It is developed by Apple itself and it is described as “a fully equipped music creation studio right inside your Mac”.
Adobe Audition
Adobe Audition is a professional audio workstation, developed by Adobe.
It’s a whole suite of tools to record, edit, mix and even restore audio.
It has a lot of professional plugins that will help you polish every track.
Its audio restoration tools will help you eliminate noise and make fine tunings.
It’s commercial, subscription based, professional software that it worths looking at if you want the highest end tools to get the best quality.
However it is more difficult to learn and use and it is overkill for most of the situations.
Launch your show!
You’ve prepared for your show, you’ve got the equipment needed, you recorded your first episode and now it is time to share it to the world!
Podcast Host
There’s a lot of great podcast hosting providers that you could use.
Most of them have all the necessary features to upload and manage your podcast.
You just have to compare, look at pricing options and pick one.
Things to be looking at are file size limits, episode limits, if they will host a free custom website for your podcast, their analytics features and their embed players.
Nightcast (hint: the company behind the site you’re looking at) is a podcast hosting provider.
We would love to help you in every step of the process, from recording your show to uploading it to directories.
Our friendly support team is here for you!
Once you’ve created an account, you need to create your new podcast and fill the information needed (name, description, hosts, categories, keywords, language…).
Upload Your First Episode
Now that you’ve created your account and podcast you have to upload your first episode.
Export the audio from your audio software of choice as 128kbps mp3, click the “New Episode” button on your host, fill in all the necessary information (episode title, release date, number, description…) and upload the audio.
If you’re planning to release new episodes weekly make sure to note it in the description for your first listeners to know.
Consistency is key for building an audience that expects your episodes at a certain time.
Create A Website
A podcast website is a great place for your audience to see information about your podcast and episodes.
Many podcast hosting providers will have a podcast website feature that you can use to easily create a website for your podcast.
You can customize the “about” page, the color scheme so it fits your branding, add hosts bios and contact information, add visitor analytics so you can track how many people are visiting and even add custom pages with more information.
A website will also contain links to your podcast feed and its link to popular podcast directories.
Some hosts even allow your listeners submit their emails for you to build an emailing list to send news and updates.
Submit To Directories
It’s time to submit your podcast to popular podcast directories.
iTunes will probably be the first directory you would probably like to submit your podcast.
Many others use iTunes to discover and list podcasts, so you won’t have to manually submit it to them.
How can I submit my podcast on iTunes?
You may also want to submit your podcast on Spotify or Breaker.
Share Your First Episode
Now that everything’s ready and your episode exists on podcast directories it’s time to share it with the world!
You can send your website’s link to your friends directly or share it on Facebook or Twitter!
Also there’s apps like Headliner that will create short custom videos with your podcast artwork and a snippet of the audio, that you can use when sharing.
Be creative, try to market your podcast in a way that will catch people’s attention and they will be interesting in listening to your show.
Good marketing is a powerful tool.
Next Steps
After you upload and share your episodes to the world, there’s still a few things that you could do.
Episode Transcriptions (Optional)
I bet there’s times that you search for new podcast to listen to, and you find an episode that’s relevant to what you’re searching.
Most of the times, under the episode description, there will be a transcription of the episode.
It’s a way for search engines (like Google or search engines on podcast directories) to understand better what your episodes are about and their content, resulting in listing them when people search for something relevant.
Although you can transcribe episodes your self, it’s a time consuming process and it may be better if you out source it.
There’s transcription services like Scribie that you can use and for a low cost will transcribe your episodes.
You can choose between both an automated process, that will have a very low turn around time and decent accuracy, or a manual process that will be more accurate.
Episode Embedding (Optional)
Do you already have a website? You can *embed your episodes!
Most podcast hosting companies provide you with beautiful embed players that you can use on your existing website.
You can embed both single episodes as well as a multiple episode player that will contain every episode of your show.
If you need more embed player options, many podcast directories have custom audio players that you can embed on your website.
Featuring your episodes on your personal website will also help with SEO and will bring more listeners to your show.
Conclusion
That’s it. Your show is now up and people can listen to what you have to say.
It wasn’t that difficult, was it?
We tried to explain everything as simple as possible, but if you are still confused about something don’t worry, it’s okay!
Our support team is here to help, feel free to contact us!